今天来时给布置了一个初学者小任务,做一个简单的短信验证demo
需要用到的技术有Vue + SpringBoot + 阿里云短信服务
可能项目比较简单,看起来比较偏向新手,适合低基础的vue+springboot入门制作,并且没有进行优化和随机数据、数据保存等操作......(懒得弄了)
下面就是在制作这个小demo的流程:
阿里云短信服务流程
1、首先,我们要有一个有余额的阿里云短信服务(在我这里,老师给我提供了公司账号使用)
(您也可以在网上搜索教程,可以给您自己的账号申请免费的短信使用额度)
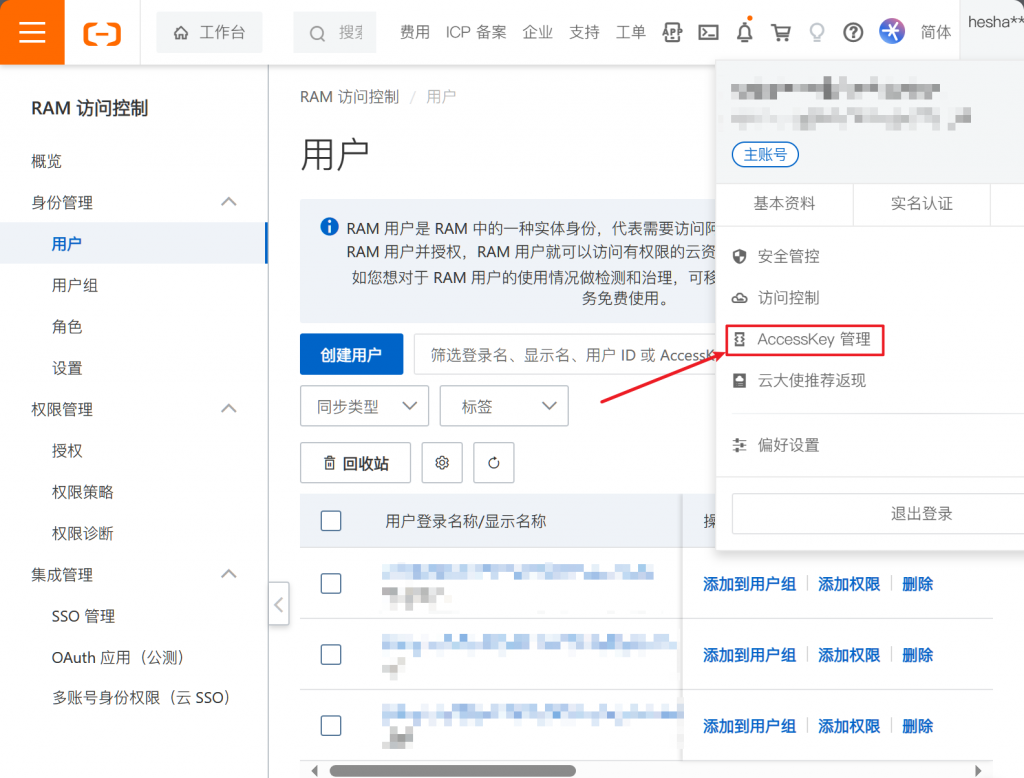
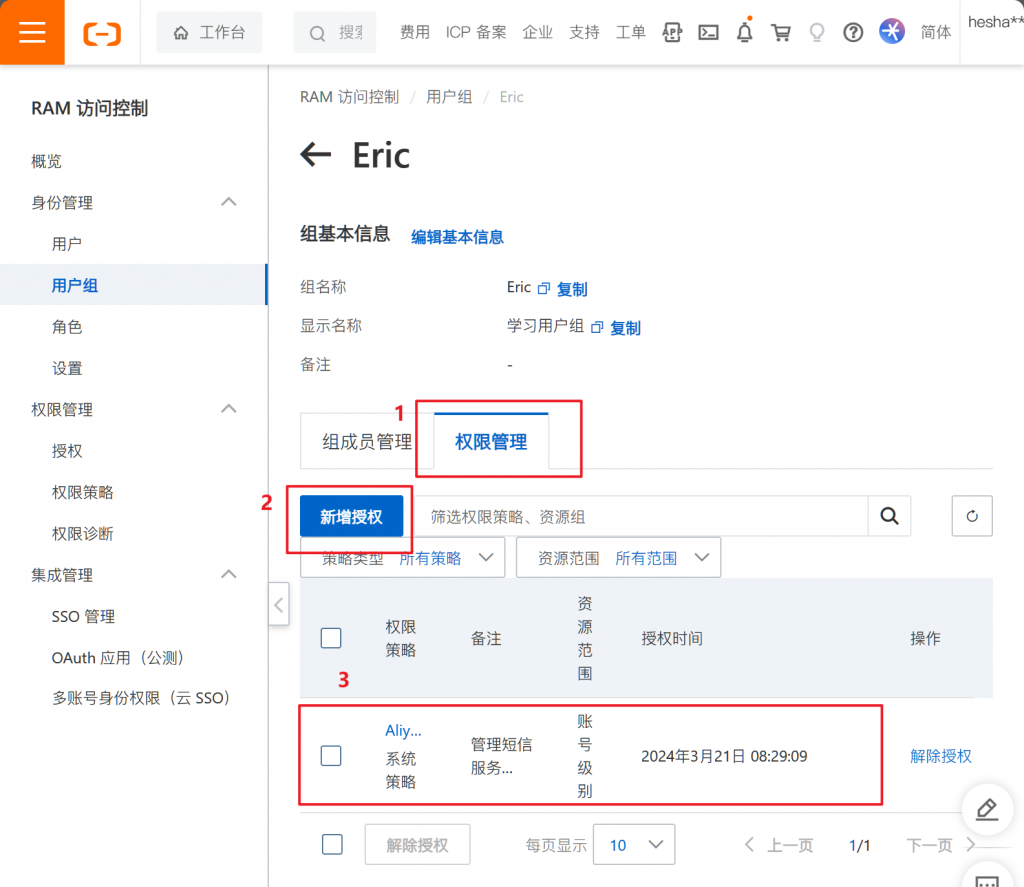
2、我们要在自己的阿里云账户上,开启一个AccessKey子用户和用户组,并且给这个我们刚刚创建的用户组添加sms短信服务权限
详细操作步骤:
1.进入AccessKey管理页面
2.创建一个我们使用的子用户
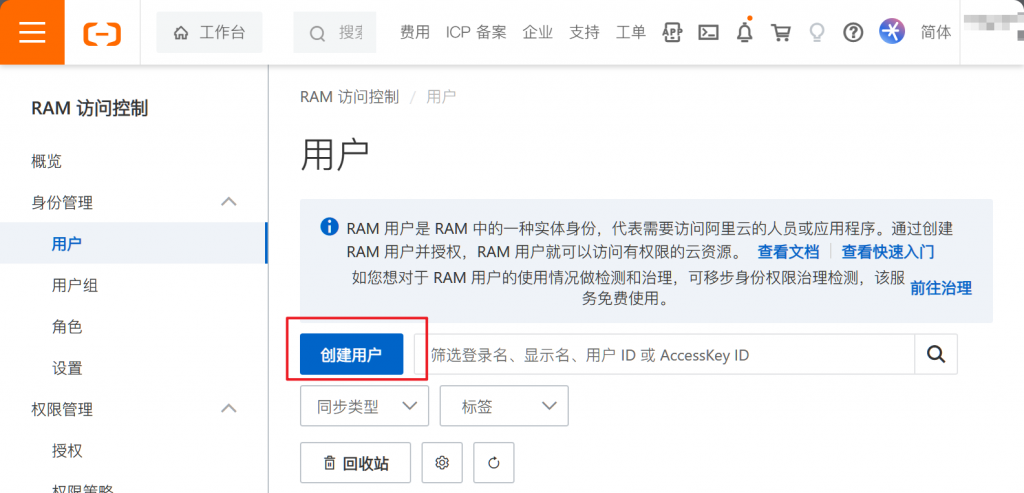
3.创建一个用户组,用于我们学习使用

4.将我们刚刚创建的子用户添加到我们的用户组里面
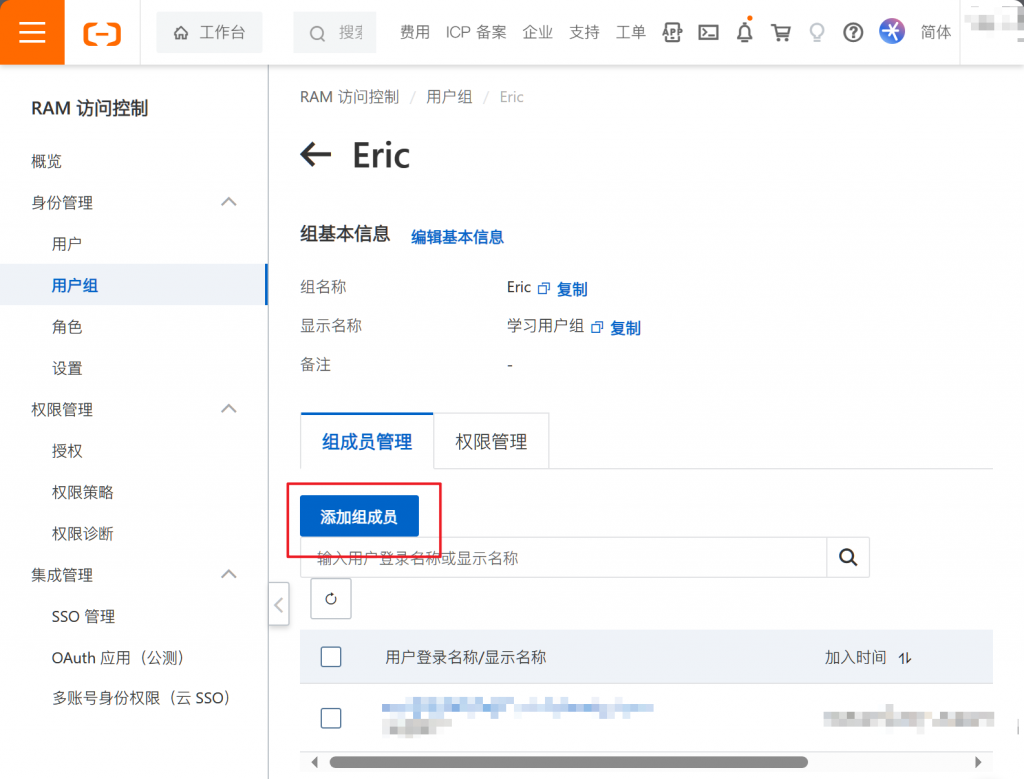
5.给我们的用户组新增一个权限管理,找到sms管理短信服务的权限
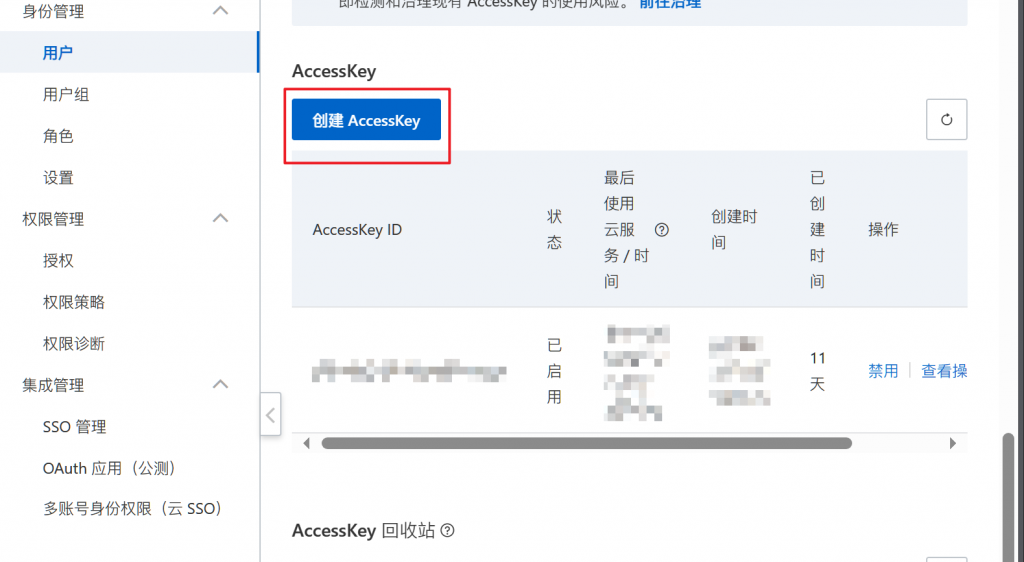
6.接下来点击 用户 -- 然后点击进入我们刚刚的用户主页,往下滑,选择创建AccessKey,然后会随机生成一段ID和密码,我们需要记住这个ID和密码,之后要用。
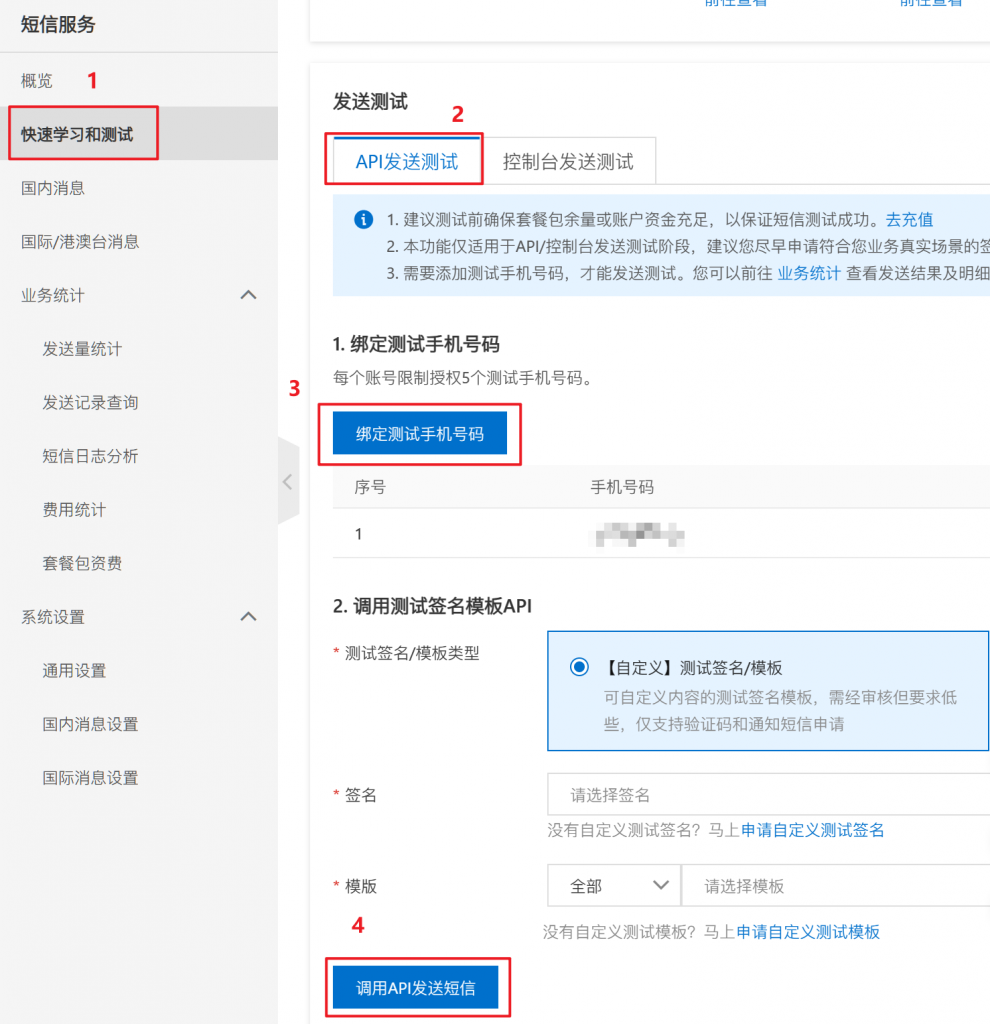
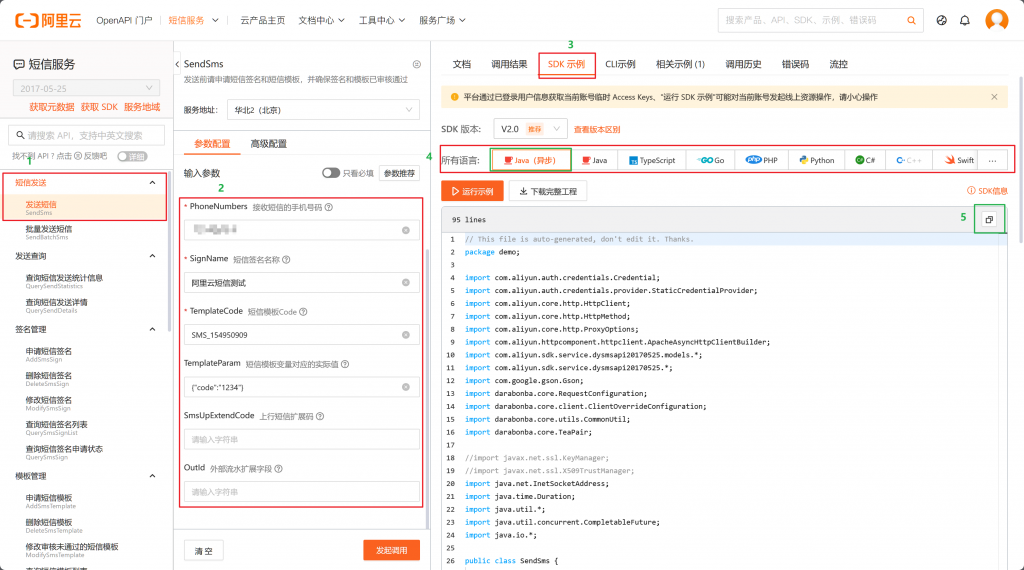
3、接下来我们进入SMS短信服务页面,开通服务,然后进入快速学习和测试,选择API发送测试,选择绑定测试手机号码,之后可以添加我们的测试模板或者您自己申请一个自定义模板,这里我们就用专用测试模板来使用
4、进入API测试页面,左边栏会有各种测试功能选择,大家可以自行探索,然后中间填写测试参数,我们自己填写就可以,之后在右边选择SDK示例,我们直接复制使用即可
SpringBoot后端服务流程
5、将我们复制的代码放到一个新的SpringBoot项目中,这个项目我们采用的是maven依赖导入
<dependencies>
<!-- springboot web服务依赖 -->
<dependency>
<groupId>org.springframework.boot</groupId>
<artifactId>spring-boot-starter-web</artifactId>
</dependency>
<!-- springboot 测试服务依赖 -->
<dependency>
<groupId>org.springframework.boot</groupId>
<artifactId>spring-boot-starter-test</artifactId>
<scope>test</scope>
</dependency><!-- 阿里云SDK服务依赖 -->
<dependency>
<groupId>com.aliyun</groupId>
<artifactId>aliyun-java-sdk-core</artifactId>
<version>4.1.0</version>
</dependency>
<!-- fastjson库依赖 转JSON字符串使用 -->
<dependency>
<groupId>com.alibaba</groupId>
<artifactId>fastjson</artifactId>
<version>1.2.62</version>
</dependency>
</dependencies>
我们一般会在我们项目的测试类中测试使用:
import com.alibaba.fastjson.JSONObject;
import com.aliyuncs.CommonRequest;
import com.aliyuncs.CommonResponse;
import com.aliyuncs.DefaultAcsClient;
import com.aliyuncs.IAcsClient;
import com.aliyuncs.exceptions.ClientException;
import com.aliyuncs.exceptions.ServerException;
import com.aliyuncs.http.MethodType;
import com.aliyuncs.profile.DefaultProfile;
import org.junit.jupiter.api.Test;
import org.springframework.boot.test.context.SpringBootTest;

import java.util.HashMap;

@SpringBootTest
class DemoApplicationTests {

    @Test
    void contextLoads() {
        //连接阿里云
        DefaultProfile profile = DefaultProfile.getProfile("cn-hangzhou", "ID", "密码");//accessKeyId和accessSecret要替换成第一步申请到的值

        IAcsClient client = new DefaultAcsClient(profile);

        //构建请求
        CommonRequest request = new CommonRequest();
        request.setMethod(MethodType.POST);
        request.setDomain("dysmsapi.aliyuncs.com");//不要修改
        request.setVersion("2017-05-25");//不要修改
        request.setAction("SendSms");

        request.putQueryParameter("PhoneNumbers", "电话");//替要发送到的手机号码
        request.putQueryParameter("SignName", "测试签名");//短信签名
        request.putQueryParameter("TemplateCode", "SMS_189762676");//短信模板号
        //构建一个短信验证码
        HashMap<String, Object> map = new HashMap<String, Object>();
        map.put("code",1688);
        request.putQueryParameter("TemplateParam", JSONObject.toJSONString(map));
        try {
            CommonResponse response = client.getCommonResponse(request);
            System.out.println(response.getData());
        } catch (ServerException e) {
            e.printStackTrace();
        } catch (ClientException e) {
            e.printStackTrace();
        }
    }

}
将我们刚刚复制的代码,粘贴到我们的测试类中使用,要修改对应的数据:
1.accessKeyId和accessSecret要替换成第一步申请到的值
2.("PhoneNumbers", "电话");//替要发送到的手机号码
3.("SignName", "测试签名");//短信签名
4.("TemplateCode", "SMS_189762676");//短信模板号
然后运行单元测试类,收到短信效果如下:
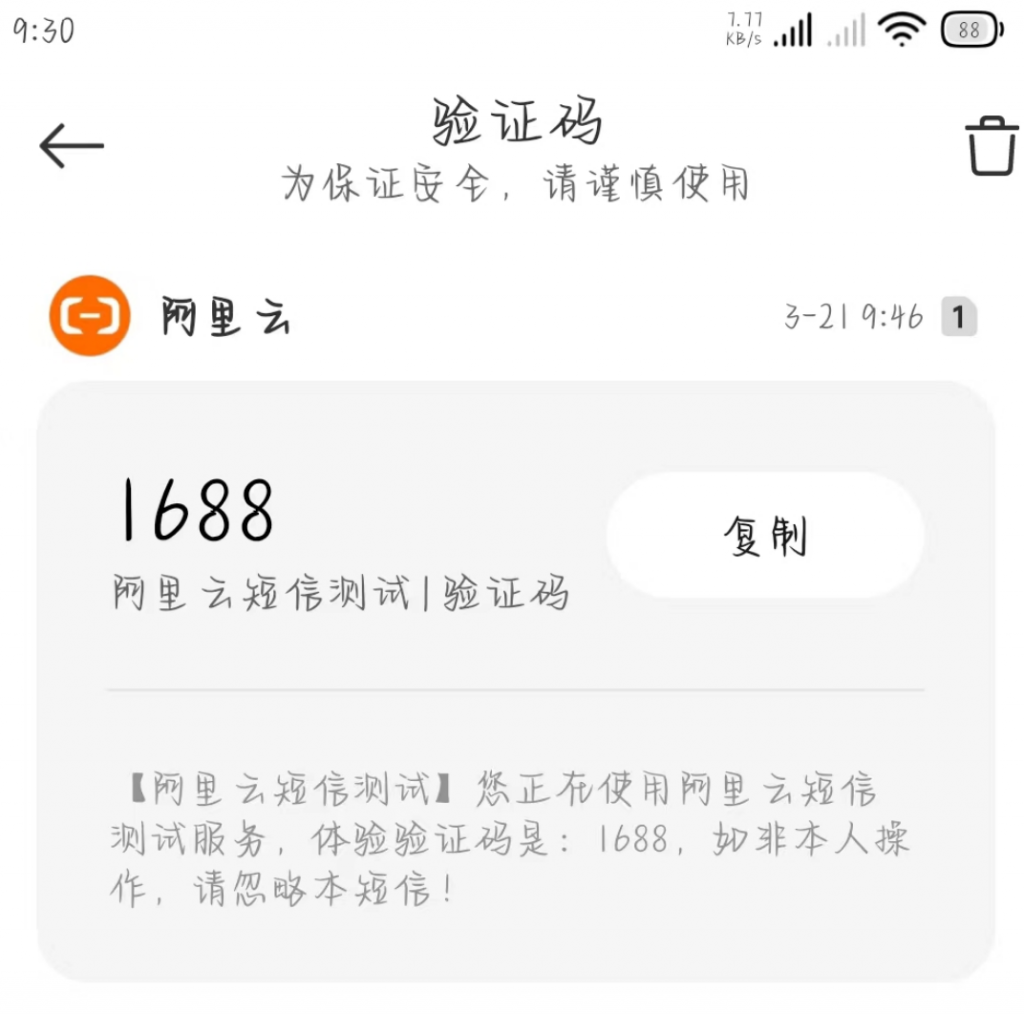
OK! 这里说明我们的短信服务测试成功了!!!
6、然后,我们将刚刚测试好的代码,改编成接口类
在Controller类中添加注解@GetMapping("/sms") 使他成为接口,让我们的前端可以调用
然后使他强行返回一个json数据,这里没有做,直接让他返回了smscode=1688
大家可以自行修改,随机验证码,验证码存储和返回,我这里就不做了。
@Controller
public class smsController {
    @GetMapping("/sms")
    public void contextLoads(HttpServletRequest request, HttpServletResponse response) {
        // Connect to Alibaba Cloud
        DefaultProfile profile = DefaultProfile.getProfile("cn-hangzhou", "ID", "密码");

        IAcsClient client = new DefaultAcsClient(profile);

        // Build request
        CommonRequest request1 = new CommonRequest();
        request1.setMethod(MethodType.POST);
        request1.setDomain("dysmsapi.aliyuncs.com");
        request1.setVersion("2017-05-25");
        request1.setAction("SendSms");

        request1.putQueryParameter("PhoneNumbers", "电话号");
        request1.putQueryParameter("SignName", "阿里云短信测试");
        request1.putQueryParameter("TemplateCode", "SMS_154950909");

        // Build a SMS verification code
        HashMap<String, Object> map = new HashMap<String, Object>();
        map.put("code", 1688);
        request1.putQueryParameter("TemplateParam", JSONObject.toJSONString(map));

        try {
            CommonResponse response1 = client.getCommonResponse(request1);
            System.out.println(response1.getData());

            // Return the smscode=1688 to the front-end
            response.getWriter().write("{\"smscode\":\"1688\"}");
        } catch (ServerException e) {
            e.printStackTrace();
        } catch (ClientException e) {
            e.printStackTrace();
        } catch (IOException e) {
            e.printStackTrace();
        }
    }
}
然后我们运行运行类,调用接口 localhost:8080/sms
Vue前端流程
7、然后我们简单的做一个前端页面
<template>
  <div id="app">
<div class="login">
    <div class="container">
      <div class="title">
        <h3>手机号登录</h3>
        <p>未注册的手机号登录后将自动注册</p>
      </div>

      <div class="form">
        <div class="form-item">
          <input
            class="inp"
            maxlength="11"
            placeholder="请输入手机号码"
            type="text"
            v-model="number"

          />
        </div>
        <div class="form-item">
          <input class="inp" placeholder="请输入短信验证码" type="text" v-model="code" />
          <button @click="getSmsCode">获取验证码</button>
        </div>
      </div>

      <button class="login-btn" @click="login">登录</button>
    </div>
  </div>
  </div>
</template>

<script>

export default {
  name: 'App',
export default {
  name: "App",
  data() {
    return {
      code: "",
      smsCode:"",
      number: "请输入手机号码",
    };
  },
}
</script>

<style lang="less" scoped>
.container {
  padding: 49px 29px;

  .title {
    margin-bottom: 20px;
    h3 {
      font-size: 26px;
      font-weight: normal;
    }
    p {
      line-height: 40px;
      font-size: 14px;
      color: #b8b8b8;
    }
  }

  .form-item {
    border-bottom: 1px solid #f3f1f2;
    padding: 8px;
    margin-bottom: 14px;
    display: flex;
    align-items: center;
    .inp {
      display: block;
      border: none;
      outline: none;
      height: 32px;
      font-size: 14px;
      flex: 1;
    }
    img {
      width: 94px;
      height: 31px;
    }
    button {
      height: 31px;
      border: none;
      font-size: 13px;
      color: #cea26a;
      background-color: transparent;
      padding-right: 9px;
    }
  }

  .login-btn {
    width: 100%;
    height: 42px;
    margin-top: 39px;
    background: linear-gradient(90deg, #ecb53c, #ff9211);
    color: #fff;
    border-radius: 39px;
    box-shadow: 0 10px 20px 0 rgba(0, 0, 0, 0.1);
    letter-spacing: 2px;
    display: flex;
    justify-content: center;
    align-items: center;
  }
}
</style>
8、之后给获取验证码和登录按钮添加点击事件,绑定一个方法
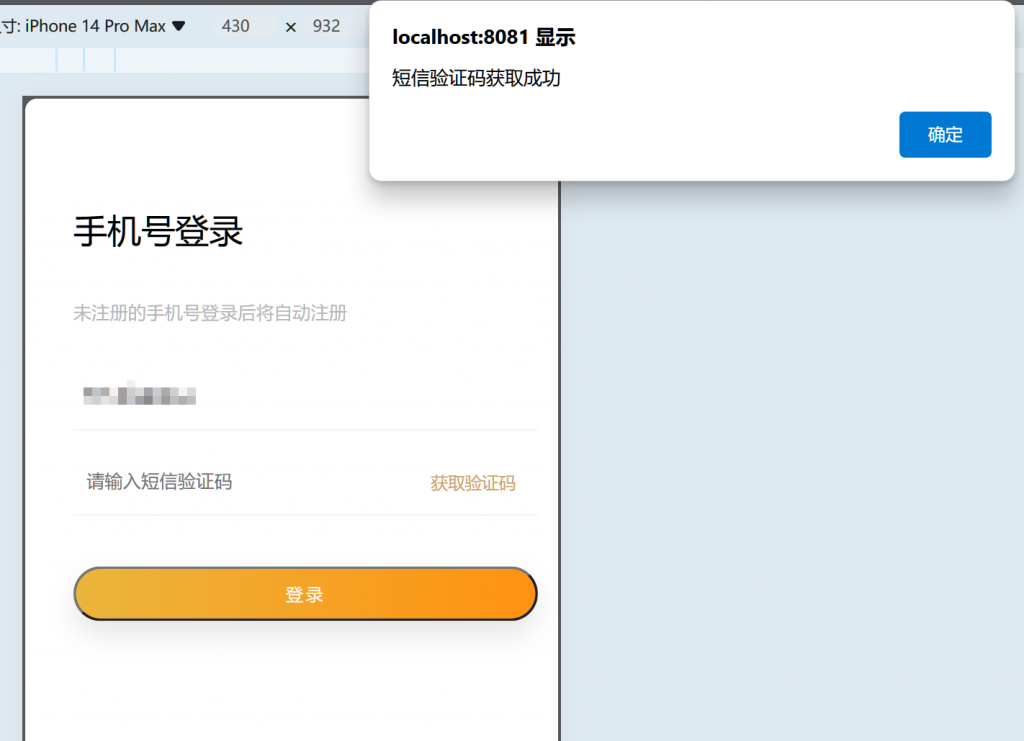
获取验证码:
getSmsCode() {
      if (this.number.length != 11) {
        alert("请输入正确的手机号");
        return;
      }
      alert("短信验证码获取成功");
      axios
        .get("http://localhost:8080/sms", {
          phoneNumber: "15735463521",
          signName: "阿里云短信测试",
          templateCode: "SMS_154950909",
        })
        .then((response) => {
          this.smsCode = response.data.smscode;
          console.log("SMS code:", this.smsCode);
        })
        .catch((error) => {
          console.error("Error sending SMS:", error);
        });
    },
登录接口(没有做详细逻辑,直接做一个判断然后返回,大家可以自行设计)
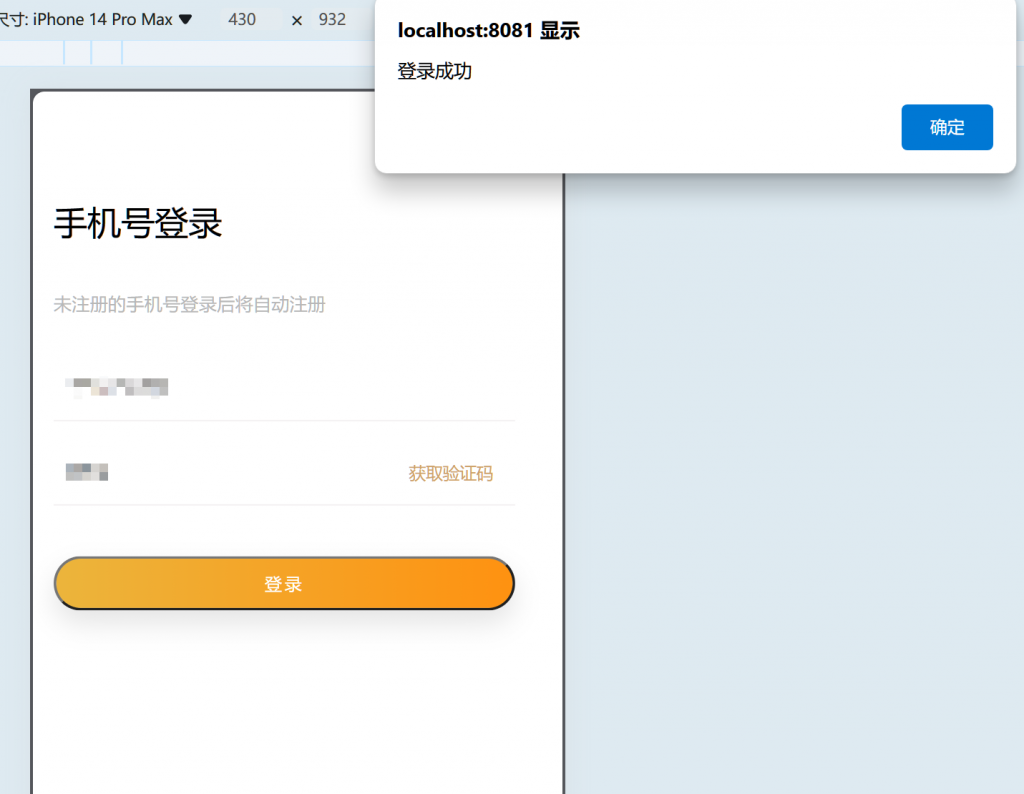
login() {
      console.log("短信验证码:", this.smsCode);
      console.log("code验证码:", this.code);
      if (this.number.length != 11) {
        alert("请输入正确的手机号");
        return;
      }
      if (this.smsCode.length != 4) {
        alert("请等待验证码发送");
        return;
      }
      // 判断code是否等于smscode
      if (this.code == this.smsCode) {
        // 弹出提示框,显示登录成功
        alert("登录成功");
        return;
      }
      alert("登录失败");
      return;
    },
这样,我们一个简单的短信验证的小demo就做好啦!!
9、展示页面: